I've fixed that now.
Behold! Upholstery Corners...my way (which may not be the 'right' way. But I like it).
Step 1
Staple around the piece you are upholstering, but leave an inch or two on both sides around the corner. I fold my corners in at the end. Waiting until the end to fold in the corners helps to even out the tension on the fabric and allows you to pull everything taut (so long as you have been mindful of stretching your fabric evenly throughout the upholstering process).
Step 2
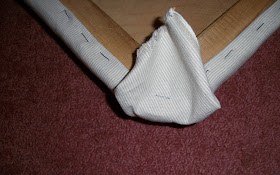
Take the unfinished 'tail' of the fabric, and, while pulling it taut, fold it over the corner of your piece and place a staple in it to keep the tension secure. Your corner should look like the picture above.
Step 3
Step 3 is easy - just trim away the top of the fabric. You will remove a 'triangle' of fabric from the upholstery. You do not *technically* have to do this, but I trim it away because it cuts down on the 'bulk' at the corner. Corners can get bulky awfully fast depending on the type of material you are using.
Step 4
Fold over one of the corners and staple in place. In the picture above I have started with the left-hand-side corner. Pull nice and tight, and try to avoid folds or wrinkles in the material, especially on the 'curve' or side of the piece you are upholstering. I find that wrinkles around the sides of a reupholstered piece are a dead give-away that it's a DIY job!
Step 5
Carefully trim the top, or excess fabric bulk, off of the corner of the folded over piece. Again, you'll be removing a 'triangle' of fabric. This cuts down on the bulk of the fabric when you fold over the final side.
Step 6
The final step is to fold over the other flap of fabric and staple it down - in this case, it's the fabric on the right side. It doesn't matter what side you start with! Sometimes, I have to remove a staple or two right next to the corner because the fabric is bunching or I didn't pull the fabric taut enough when I was stapling the sides. This is OK! Just remove the staples, reposition the fabric, get rid of wrinkles and bunches, and restaple!
I like to complete my first corner and then
That's it! Easy as pie (actually, pie is not that easy, so clearly, whoever came up with that saying is a really big over-achiever). What I mean to say was 'easy as picking up a pie at the bakery' (with which I have far more experience)!


Thank you so much for the great photos of your process! A picture truely is worth a thousand words! I get it now.
ReplyDeleteJo Ann
Thanks so much for this. Made sense....helped me finish my headboard project with nice corners.
ReplyDelete