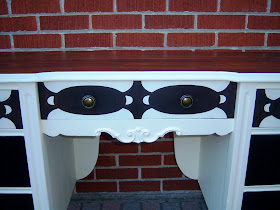
Here it is in all it's glory! I'm really happy with how this piece turned out in the end, although it had its struggles.
I especially like the sanded and oiled top. It's perfect for the kitchen! I had to strip the old lacquer and finish which is always extra stubborn the older the piece. After stripping, I sanded, sanded, sanded with my handheld power sander. I stared with 60 grit and worked my way up to 280, I wiped it down and then wiped two coats of mineral oil on the top. Mineral oil is great for the kitchen as it's food-safe (how do I know? You can take it orally to...move things along... and it's available in the drug store isle of your local supermarket or other large box store!) It's also...cheap! Ha!
A close-up of the front detailing. After sanding and staining the decorative veneer, I painted the back. After that I wasn't too sure of my choice as I wasn't convinced that the 'art deco' style veneer actually coordinated with the other delicate and more 'antique' embellishments. I think the finish on the other drawers were what was going to make or break the continuity of this piece.
I was also happy with how the veneer 'patches' turned out and they blend fairly well. Not bad for a first attempt. Definitely good enough for our kitchen, I say!
I had a hard time deciding on what to do for the finish on the other drawers. Originally, I had thought I would do some sort of brown decoupage print: flowers, scrolls, newsprint...I wasn't sure. But because I'd used an ebony or black stain for the veneer, I needed something darker than I originally thought. Out went the brown paper and in came more of the ebony stain. I think it was the right choice. I decided to keep it simple. I did need to cover up the drawer fronts as the veneer wasn't in great shape, so I used an easy 'leather look' technique.
Then I applied the ebony stain to a baby wipe (you can use a sponge, brush or paper towel) and rubbed it gently over the top of the paper until I had the depth of colour I wanted. I sealed over the stain with a coat of white glue. I set the drawers out in the sun, and once they had dried, trimmed off the excess paper from the edges using a utility knive (Exacto knife). When the drawers were totally dry, I sealed them with a coat of clear spray sealant - you could also use polyurethane.
Surprise! Red inside!
The last special detail I added were these hand-antiqued knobs. I was totally frustrated when I went to my pulls and knobs stash and discovered I only had 6 of almost all the knobs I own! I tried to find coordinating knobs, but they were the wrong colours. After boiling all the knobs in a pot of water and dish soap to remove their 'coatings,' I scrubbed them and dried them. Then I used some of the ebony stain and some enamel spray paint to give them a similar aged look, sprayed them with a couple of coats of clear sealant and they were good to go!
The two knobs on the middle drawer are a bit smaller than the others, but they coordinate and don't detract overall. Good enough!
And there you have it! A $60 vanity transformed into a kitchen island and an extra prep space for our smaller kitchen.
I'm linking up and sharing this makeover at Funky Junk Interiors - click below to check out the other creative projects. Lots of inspiration ahead!


looks great Em!
ReplyDeleteWow Emily I am SO IMPRESSED!!!!
ReplyDeleteThanks, Tasha and Christina! The piece looks great in the kitchen, too! Can't wait to work on more.
ReplyDelete