I picked up TWO of these framed mirrors at an estate auction for a price so low, I can't publish it here, because it will make too many readers jealous!
This project was quick and easy and used a lot of tried-and-true techniques I've picked up over the years.
For a time I used to make my own tumbler glasses out of recycled Perrier (or comparable No Name brand) bottles. The process to cut the glass and grind down the lip of the glass is complicated, and not what this post is about (plus I don't have process pictures)....so skip ahead to the part where I etch the glasses using acid etching cream.
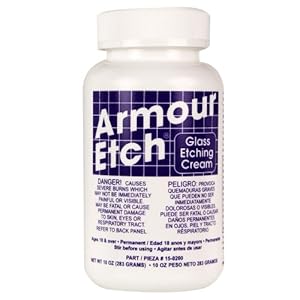
I use Armour Etch, but there are other brands out there, too. I buy mine off of Ebay usually since I can get a better deal. I loves me some deals!
The technique I use is simple - and is similar to how I stencil my pillows. I find a design or image I like, often I blow it up using Block Posters, and I print it out. Then I glue the image on to Mac Tac or contact paper and use nail or embroidery scissors to cut out the design.
If it's a large image, be very careful applying the contact paper. Apply it in sections and be certain to push out any air bubbles. Sometimes I have to cut a slit or seam in the contact paper as it can stretch a little during application. I'll do this so I can get most of the image lined up properly, and then fill in the gap that might be left with a small piece of contact paper.
Be sure to really rub down around the edges of the image - you can use a credit card. Or if you're me, you use your nail (or perhaps, more accurately, stubby nail nubbin).
I didn't snap a picture of the acid cream application. You can image it though; the cream has a consistency like toothpaste and can also be spread with an old credit card. A great bonus: acid cream is reuseable! So, coat your image with a thick, even, layer, let sit for 20-30 mins., and then scrape off using the credit card and return it to the tub! How's that for value-for-money? After you remove the acid cream, you'll want to wipe it down with water and an old rag. Warning: do not get the acid cream on any other surface than the one you want etched - it WILL mark any other glass surface it come in contact with, even for a minute!
Here's a peek at the mirror in process. I'm removing the contact paper after having removed the acid cream. Nice crisp lines!
Polish the mirror and you're finished! A functional art piece for your bedroom, office or to create interest in the hallway. You can use acid etching cream on any glass surface - try it! You can make all kids of neat and inexpensive gifts.
Monday, April 22, 2013
Sunday, April 21, 2013
French Shabby Chic Tables - Hot Stuff!
Here's a quick before and after to share with you - this table is already sold. In fact, it sold the day I posted it for sale. These coffee tables are always extremely popular - I can't make them fast enough! Perfect!
They all start out the same....solid, curvy, and dated.
But they all end up a little differently...
I especially like the "Queen Bee" graphic in the centre (as always, graphics from 'The Graphics Fairy!' Google her - she is a goddess!)
They all start out the same....solid, curvy, and dated.
But they all end up a little differently...
I especially like the "Queen Bee" graphic in the centre (as always, graphics from 'The Graphics Fairy!' Google her - she is a goddess!)
Short and sweet - just like this ol' coffee table! I'll bid her 'au revoir' tomorrow afternoon. *sob*
I'm sharing this table makeover at The Graphics Fairy. You should bibbity-bobbity-boo yourself over there and check out the hundred (thousands?) of vintage graphics she has to download!

Sunday, April 14, 2013
Barrel Coffee Table Redux
I saw this tubby beauty a few weeks ago for a STEAL (a steal, I tell you!) and I snatched her up as quick as a wink (unless you have trouble winking, in which case, probably faster).
The legs and top were what caught my eye. What I knew wouldn't work was the tacky door and boxy profile. I had a quick fix for a little weight-loss for this piece!
I [finally] inherited a jigsaw for Christmas last year and I'd been dying to try it out. I found some brand new blades on sale and set off to the basement for a remodel - quick as a jig (Bwahaha. Hahaha. Ha?)
Using the jigsaw, I cut out the side panels relatively quickly and easily. The door was easy to unscrew and remove.
I had to patch trim around the legs and lower shelf after I removed the panels. This was probably the most time consuming aspect of the project (well, maybe the stenciling took a while, too), as wood filler needs a couple of applications in deeper rivets.
I'm sorry I didn't take any process pictures of this project. I think I meant to, but then got distracted by the excitement of the jigsaw and the stencil work on the top. After the wood filler was dried and sanded, a couple quick coats of homemade chalk paint saw the bottom half of this piece ready to go.
I used a small angled paintbrush to paint multiple layers of colour on the top and then a foam stencil brush to stencil on the fleur-de-lis accents.
I finished it off with a couple of coats of varathane floor finish - my favourite - and she was looking good!
I had painted over the wood filler with an off-white homemade chalk paint, so when distressing, this colour came through on the decorative feet and legs. I liked how it tied into the check pattern on the table-top.
Now this barrel coffee table is much more sleek, modern and stylish - and no longer retro and dated!
The legs and top were what caught my eye. What I knew wouldn't work was the tacky door and boxy profile. I had a quick fix for a little weight-loss for this piece!
I [finally] inherited a jigsaw for Christmas last year and I'd been dying to try it out. I found some brand new blades on sale and set off to the basement for a remodel - quick as a jig (Bwahaha. Hahaha. Ha?)
Using the jigsaw, I cut out the side panels relatively quickly and easily. The door was easy to unscrew and remove.
I had to patch trim around the legs and lower shelf after I removed the panels. This was probably the most time consuming aspect of the project (well, maybe the stenciling took a while, too), as wood filler needs a couple of applications in deeper rivets.
I'm sorry I didn't take any process pictures of this project. I think I meant to, but then got distracted by the excitement of the jigsaw and the stencil work on the top. After the wood filler was dried and sanded, a couple quick coats of homemade chalk paint saw the bottom half of this piece ready to go.
I used a small angled paintbrush to paint multiple layers of colour on the top and then a foam stencil brush to stencil on the fleur-de-lis accents.
I finished it off with a couple of coats of varathane floor finish - my favourite - and she was looking good!
I had painted over the wood filler with an off-white homemade chalk paint, so when distressing, this colour came through on the decorative feet and legs. I liked how it tied into the check pattern on the table-top.
Now this barrel coffee table is much more sleek, modern and stylish - and no longer retro and dated!
Wednesday, April 10, 2013
Retro Ombre Cabinet
I wanted to get up some pictures of the tables I completed recently, but discovered that a certain special someone happened to take the camera with him to work (out of town) for the week. SO...here's a project I finished last year instead.
I LOVED this update - and sold it to a friend before I had a chance to list it.
I bought this dated (let's just say it: *ugly*) old cabinet at an estate auction for either $7.50 or $12.50..at this point I can no longer remember.
The inside was nothing to write home about. So I didn't. Poor family is still waiting for a letter...
Now for the 'AFTER!'

Ta da! I didn't want to give this cabinet just any old makeover (because frankly, it needed more than that!). All the 'ombre' furniture makeovers I had been seeing inspired me (and since that fad was a few years old, it was about time for me to jump on the bandwagon) so I thought the cabinet was a perfect makeover. I had a blue-grey paint I used as my base colour and simply added black or white paint to get the colour gradation.
I loved how it ended up looking like stained-glass!

The inside deserved a little attention, so I gave it a fresh coat of white paint. I also removed the hardware and spray painted them from retro-gold to modern-brushed silver. Perfect!
Here are a couple of things I learned waaay back then:

To get a nice, smooth finish on top of your paint you can try thinning the paint down with water (this will dilute the pigmentation of your paint - ie: make your paint a bit 'lighter') or with a special 'paint extender' which doesn't dilute the colour but extends the time paint stays 'wet' and also helps it to 'settle' with fewer brush strokes when you're finished. I use this brand from Benjamin Moore.
I LOVED this update - and sold it to a friend before I had a chance to list it.
I bought this dated (let's just say it: *ugly*) old cabinet at an estate auction for either $7.50 or $12.50..at this point I can no longer remember.
The inside was nothing to write home about. So I didn't. Poor family is still waiting for a letter...
Now for the 'AFTER!'
Ta da! I didn't want to give this cabinet just any old makeover (because frankly, it needed more than that!). All the 'ombre' furniture makeovers I had been seeing inspired me (and since that fad was a few years old, it was about time for me to jump on the bandwagon) so I thought the cabinet was a perfect makeover. I had a blue-grey paint I used as my base colour and simply added black or white paint to get the colour gradation.
I loved how it ended up looking like stained-glass!
The inside deserved a little attention, so I gave it a fresh coat of white paint. I also removed the hardware and spray painted them from retro-gold to modern-brushed silver. Perfect!
- Semi-gloss 'Painter's Touch' black paint doesn't mix well into 'homemade chalk paint.' I don't know why. It just doesn't. I used a coat of white high adherence primer: Zinsser Bulls Eye 1-2-3. After the primer dried, I painted it with about 3 coats of the black semi-gloss.
To get a nice, smooth finish on top of your paint you can try thinning the paint down with water (this will dilute the pigmentation of your paint - ie: make your paint a bit 'lighter') or with a special 'paint extender' which doesn't dilute the colour but extends the time paint stays 'wet' and also helps it to 'settle' with fewer brush strokes when you're finished. I use this brand from Benjamin Moore.
Tuesday, March 12, 2013
Tiny Two-Tiered Table
Too cute!
OK, you know those dated, your grandma-had-one tables that you often see at thrift stores or auctions? You know the ones....
Sometimes it's hard to find these little tables in solid wood. I was lucky enough to come across one for a steal at one of our local thrifts - along with this tray (with awful ivy stencil. Yikes!). A makeover couldn't come fast enough!
I've been waiting to do this to one of these tiny, two-tiered tables:
That's right! Remove that awkward 1/3 of the table addition. It's super easy - just a little 'unscrewing' on the underside of the table.
At this point I also took the opportunity to get rid of some of the wobbly-ness of the table by tightening the legs. So many people pass up great items at thrift stores because of a little wobbling. This can always be fixed, people! Do not be deterred by the wobble!!
I wanted to coordinate the tray and the table to have them work together as a set. I see them out in a sunroom or on the porch or balcony this summer! You can prep cool drinks and snacks in the kitchen, carry them outside on the tray, and serve them on the table. Yes, I think SO!
After I finished both graphics, I felt that the 'At Home' graphic (c/o The Graphics Fairy as always!) needed to be 'bolder' to blend more seamlessly with the frame graphic on the table.
These graphics are added using the regular technique - I use a projector and permanent marker. There are all kinds of techniques you can use to transfer graphics. I prefer my way because it gives me the most control over my image and I can play around with placement a lot before committing to a design.
Can't wait for summer!!
OK, you know those dated, your grandma-had-one tables that you often see at thrift stores or auctions? You know the ones....
Sometimes it's hard to find these little tables in solid wood. I was lucky enough to come across one for a steal at one of our local thrifts - along with this tray (with awful ivy stencil. Yikes!). A makeover couldn't come fast enough!
I've been waiting to do this to one of these tiny, two-tiered tables:
That's right! Remove that awkward 1/3 of the table addition. It's super easy - just a little 'unscrewing' on the underside of the table.
At this point I also took the opportunity to get rid of some of the wobbly-ness of the table by tightening the legs. So many people pass up great items at thrift stores because of a little wobbling. This can always be fixed, people! Do not be deterred by the wobble!! I wanted to coordinate the tray and the table to have them work together as a set. I see them out in a sunroom or on the porch or balcony this summer! You can prep cool drinks and snacks in the kitchen, carry them outside on the tray, and serve them on the table. Yes, I think SO!
After I finished both graphics, I felt that the 'At Home' graphic (c/o The Graphics Fairy as always!) needed to be 'bolder' to blend more seamlessly with the frame graphic on the table.
These graphics are added using the regular technique - I use a projector and permanent marker. There are all kinds of techniques you can use to transfer graphics. I prefer my way because it gives me the most control over my image and I can play around with placement a lot before committing to a design.
The final step was to dry brush on a layer of off-white paint over the top of the table and inside the tray. This gave the whole thing an aged feel and served to tone down the darkness of the graphic. I also distressed the table legs, top, and tray.
Can't wait for summer!!
Wednesday, March 6, 2013
Sideboard Makeover - It's A Steal!
A few weeks ago, I finished a fantastic sideboard (or the bottom half of a hutch, really) for a friend. She bought it at the local Sally Anne for $45 and commissioned me to refurbish it.
It needed a little love...one of the doors needed regluing and the drawers needed some extra attention, not to mention the whole thing needed a facelift - it was looking a little too 'wooden.' Ha!

I had great bones to work with so the first step was to give the whole thing a once over with TSP to remove the ancient grime. I turned it upside down because I knew I would be stripping the top and turning it on it's head made painting the legs easier.
I removed all the knobs from the two upper drawers and the two doors. These were painted, distressed and waxed and reattached in the final stages.
I painted the lower half with homemade chalk paint and used my Wagner paint sprayer to quickly apply two coats - I finally got the right viscosity! Worked like a charm this time. When it was dry, I finished it with MinWax Finishing Paste.

I stripped the top using a low VOC, water-based stripper that I love and can get readily and inexpesively at Home Hardware. When using stripper, save yourself and WAIT for the product to work for you (that's the hardest part!). Waiting is honestly the best thing you can do and makes the stripping process [almost] enjoyable.
It needed a little love...one of the doors needed regluing and the drawers needed some extra attention, not to mention the whole thing needed a facelift - it was looking a little too 'wooden.' Ha!
I had great bones to work with so the first step was to give the whole thing a once over with TSP to remove the ancient grime. I turned it upside down because I knew I would be stripping the top and turning it on it's head made painting the legs easier.
I removed all the knobs from the two upper drawers and the two doors. These were painted, distressed and waxed and reattached in the final stages.
I painted the lower half with homemade chalk paint and used my Wagner paint sprayer to quickly apply two coats - I finally got the right viscosity! Worked like a charm this time. When it was dry, I finished it with MinWax Finishing Paste.

Once I removed all the stripper (using a scraper, water, steel wool and an old cloth) I let the top dry overnight. Then I sanded it down using medium-grit sandpaper and a final sanding with 320 grit to get it nice and smooth. Before applying my finish, I always wipe down with a tack cloth! This is a sticky cloth that attracts and removes small particles and dust that can ruin the finish. I've started using floor finish recently and love it! It brushes on easily, dries hard and durable, and won't yellow. Love!
This piece looks fantastic and I was sad to see her go...
but know she'll have a fabulous new 'second' life.
Wednesday, February 27, 2013
Union Jack Stool
Before the snow arrived last night and this morning, I was able to pick up a few treasures from St. V de P (they're calling St. Vincent de Paul's in our town 'Vinnie's.' Is this being done anywhere else?). I can't wait to get to work on them...
For now, here's a peek at a cute vintage stool I picked up at an auction a few weeks ago.
I'd like to say that this stool is an antique, but there isn't enough information for me...however, the lid was padded with the ol' horse hair and the covering was real leather...so if you want to live on the edge, call it an antique.
I ripped off the top and replaced it with new foam and fabric. You can read about how I fold upholstery corners at 'Upholstery Corners...My Way.'
I used a heavy cotton with a tiny neutral stripe, masked off the Union Jack flag with tape, and sponged on muted red & blue-grey paint. Be careful not to water down the paint too much; this will cause it to bleed past the tape lines and this won't do! Use less paint on your sponge pouncer (or stencil brush)...less IS more in this case! After the paint dried, I scuffed it up with some rough sandpaper.
The bottom got a couple of coats of off-white chalk paint and was gently distressed using water and a green dish scrubby...yes! That's it! A green dish scrub is all you need. No sandpaper...it's overkill. The paint softens when you apply water, and the dish scrub roughs away the paint in a jiffy.
Here she is now:
Surprise! The lid lifts off for some incognito storage. It's painted and I added a little paper liner.
This little guy is for sale - $50. Check out the details here.
For now, here's a peek at a cute vintage stool I picked up at an auction a few weeks ago.
I'd like to say that this stool is an antique, but there isn't enough information for me...however, the lid was padded with the ol' horse hair and the covering was real leather...so if you want to live on the edge, call it an antique.
I ripped off the top and replaced it with new foam and fabric. You can read about how I fold upholstery corners at 'Upholstery Corners...My Way.'
I used a heavy cotton with a tiny neutral stripe, masked off the Union Jack flag with tape, and sponged on muted red & blue-grey paint. Be careful not to water down the paint too much; this will cause it to bleed past the tape lines and this won't do! Use less paint on your sponge pouncer (or stencil brush)...less IS more in this case! After the paint dried, I scuffed it up with some rough sandpaper.
The bottom got a couple of coats of off-white chalk paint and was gently distressed using water and a green dish scrubby...yes! That's it! A green dish scrub is all you need. No sandpaper...it's overkill. The paint softens when you apply water, and the dish scrub roughs away the paint in a jiffy.
Here she is now:
Surprise! The lid lifts off for some incognito storage. It's painted and I added a little paper liner.
This little guy is for sale - $50. Check out the details here.
Subscribe to:
Posts (Atom)